

Introduction
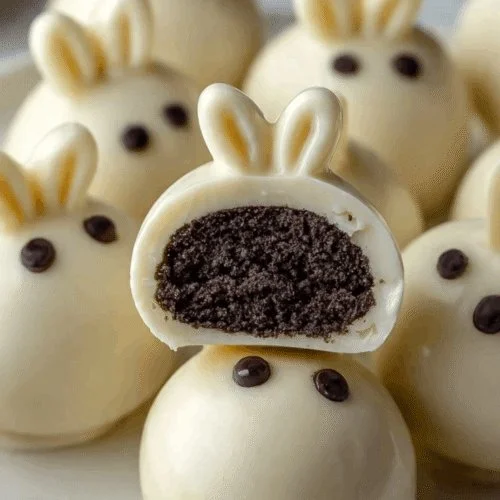
The kitchen smelled like warm chocolate and melted white candy as I rolled my first little bunny yesterday, and I smiled. Bunny Oreo Balls arrive fast and bring that exact comfort — sweet, creamy, and a little sticky in the best way. This always takes me back to Sunday dinners. If you like quick no‑bake sweets, you might also enjoy trying a simple 3-ingredient Oreo fudge for a different twist.
Why You’ll Love This
- Ready in under an hour, no oven needed.
- Kid-approved, and fun to decorate.
- Budget-friendly: pantry staples transform easily.
- Make-ahead friendly for parties or gifts.
Quick Recipe Snapshot
- Servings: about 24 small bunnies
- Prep time: 30 minutes (plus chilling)
- Cook time: 0 minutes
- Total time: 1 hour (including chill)
- Skill level: Easy
- Taste: sweet + creamy with a crisp chocolate bite
These steps give you confidence; the textures guide you if you’re new to dipping treats.
Ingredients You’ll Need

- 24 chocolate sandwich cookies
- 8 oz cream cheese, softened
- 12 oz white chocolate or candy melts
- Pink candy melts or colored icing for noses
- Mini chocolate chips or edible eyes
- Optional: pastel sprinkles for extra flair
Chef notes:
- Room-temp cream cheese = easier mixing.
- Use fresh cookies for best crunch.
- Candy melts melt smooth and set glossy.
I like to have a bowl of warm water at hand when I melt chocolate; it helps smooth tiny lumps and reminds me of 3-ingredient Oreo fudge techniques.
How to Make It
- First, crush the cookies. Place the chocolate sandwich cookies in a food processor and pulse until they are finely crushed. Pour the crumbs into a mixing bowl and run your fingers through them — they should feel sandy.
- Then, add the cream cheese. Mix the softened cream cheese into the crumbs with a spatula until a smooth, sticky dough forms. It will cling together when pressed.
- Next, shape the bunnies. Scoop small portions (about 1 tablespoon) and roll into balls. Pinch the top gently to form two tiny ear shapes. A slight indentation tells you you’re on track.
- Meanwhile, chill the bunnies. Place them on a parchment-lined baking sheet and refrigerate for at least 30 minutes so they firm up.
- While they chill, melt the white chocolate. Use a microwave in 20‑second bursts, stirring between bursts, or melt over a double boiler until smooth and glossy.
- Then dip and decorate. Using a fork, dip each chilled ball into the chocolate and lift, tapping the fork on the bowl to remove excess. Before the coating sets, add eyes, a pink nose, and sprinkles. The chocolate should look shiny and flow evenly.
- Finally, let them set. Allow to set at room temperature or pop them in the fridge for 10–15 minutes to speed it up. They should feel firm to touch when done.
If you want more hands-on tips, I wrote a quick note about a similar treat technique at 3-ingredient Oreo fudge.
Kitchen Tips (From My Kitchen)
- Time-saver: Chill the scooped balls while you melt chocolate; it speeds dipping.
- Common mistake + fix: If coating cracks, your balls were too cold — let them warm 5 minutes before dipping.
- Simple variation: Add a teaspoon of almond extract to the dough for a nutty note.
Serving Ideas
- Holiday platter: Arrange on a tray with pastel sprinkles and marshmallow chicks for Easter.
- After-dinner treat: Serve alongside espresso for a grown-up sweet bite.
- Kids’ party: Let little hands decorate with candy eyes and sprinkles.
- Gift idea: Pack in a small box with tissue paper for neighbors.
For a playful pairing, set them next to a slice of pound cake or try them with a small scoop of vanilla ice cream; you’ll enjoy the contrast like the one in 3-ingredient Oreo fudge memories.
Storing & Leftovers
- Fridge: Store in an airtight container for up to 7 days.
- Freezer: Freeze on a tray, then transfer to a bag for up to 2 months.
- Reheat: Let thaw in the fridge, then bring to room temp to keep texture.
Leftover idea: Chop and fold into vanilla ice cream for an Oreo bunny sundae.

Bunny Oreo Balls
Ingredients
Method
- Crush the cookies in a food processor until finely crushed, resembling sandy crumbs.
- Mix the softened cream cheese with the cookie crumbs until a smooth, sticky dough forms.
- Scoop small portions (about 1 tablespoon) and roll them into balls, pinching the top gently to form ears.
- Place the bunny shapes on a parchment-lined baking sheet and refrigerate for at least 30 minutes.
- Melt the white chocolate or candy melts in the microwave or over a double boiler until smooth and glossy.
- Dip each chilled bunny ball into the melted chocolate, tap the fork to remove excess, and decorate with eyes, a pink nose, and sprinkles before the coating sets.
- Allow the bunnies to set at room temperature or refrigerate for another 10-15 minutes until firm.
Notes
FAQs
Q: Can I make these ahead?
A: Yes. You can shape and chill the dough one day ahead and dip the next; finished Bunny Oreo Balls keep well in the fridge.
Q: Any good substitutions?
A: You can use light cream cheese or flavored cream cheese, though flavor and texture will change slightly.
Q: How do I know when they’re done?
A: The coating should be firm and glossy. When you press lightly, it shouldn’t leave a dent.
Q: Can I freeze them?
A: Yes. Freeze on a tray, then bag. Thaw in the fridge before serving for best texture.
Final Thoughts
I love how these little Bunny Oreo Balls come together — simple pantry ingredients, a few minutes of hands-on play, and a tray of crowd-pleasing sweets. Try them with different eyes and noses, and make the recipe your own. I can’t wait to hear how yours turn out; enjoy these Bunny Oreo Balls.
Conclusion
For another take on Oreo no‑bake treats, see this trusted twist: Bunny Oreo Balls Recipe | Food Network Kitchen.
And for a homemade blogger version with extra photos, check out this charming write-up: Bunny OREO Balls – A Pumpkin And A Princess.


Leave a comment