


Introduction
The kitchen smelled like warm cocoa and browned butter, while the oven hummed a steady, cozy note. Right away I thought of afternoons with my grandmother, and how one tiny bite could quiet a house. These Red Velvet Whoopie Pies arrive soft, slightly cakey, and filled with tangy cream cheese—this always takes me back to Sunday dinners. If you like quick sweets, you might also enjoy my riff on simple chocolate treats like this 3-ingredient Oreo fudge for a fast finish.
Why You’ll Love This
- Soft, cake-like cookies with a creamy center—comfort in every bite.
- Quick to pipe and bake; perfect for busy afternoons.
- Kid-approved and great for parties or school treats.
- Uses common pantry ingredients—budget-friendly.
Quick Recipe Snapshot
- Servings: about 12 whoopie pies (24 cookies)
- Prep time: 25 minutes
- Cook time: 10–12 minutes
- Total time: 40–45 minutes
- Skill level: Easy
- Taste: sweet + tangy cream cheese
This recipe reads simple, and you’ll feel confident from the first step.
Ingredients You’ll Need
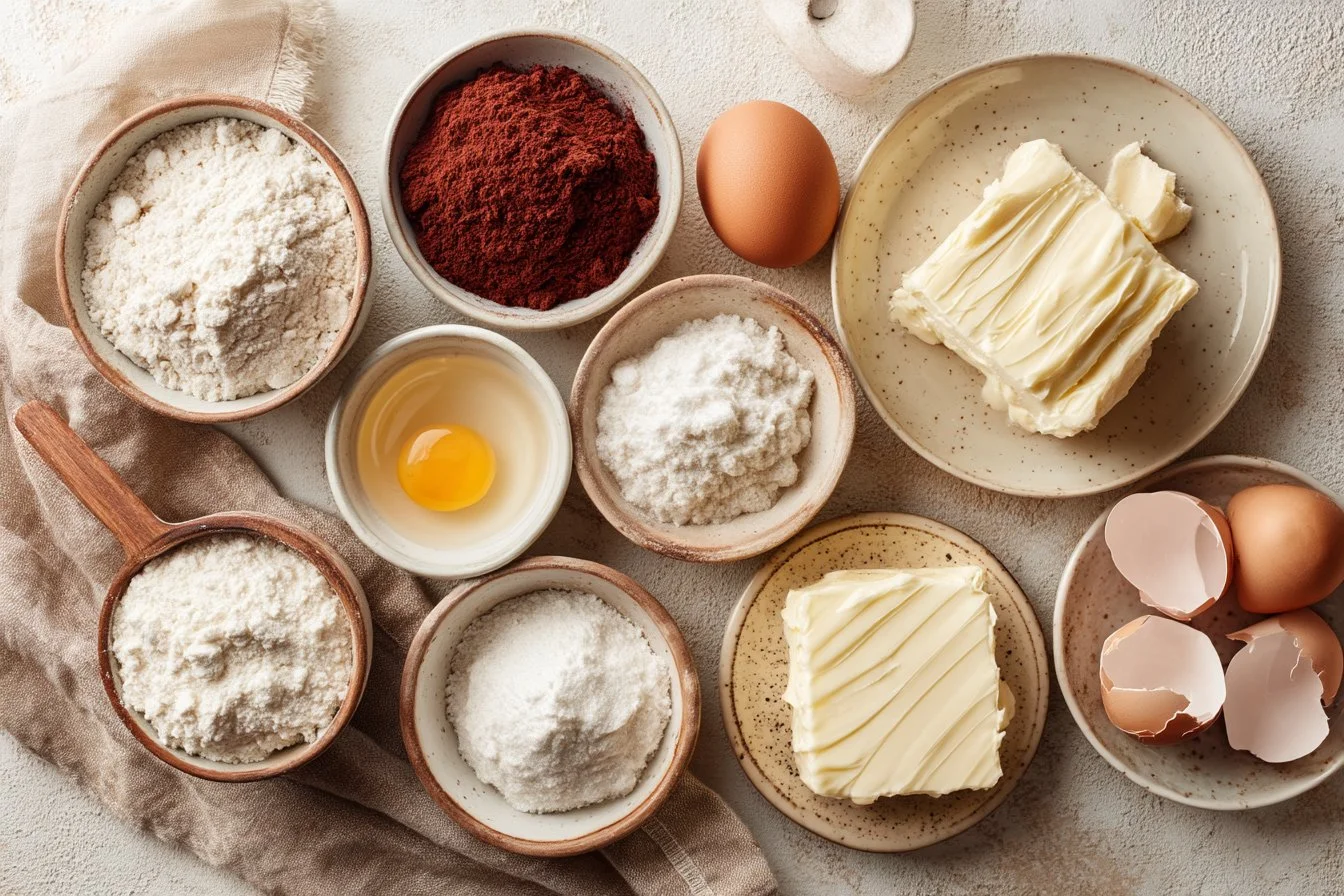
- 2 cups all-purpose flour
- 2 Tbsp unsweetened cocoa powder
- 1/2 tsp baking powder
- 1/4 tsp salt
- 8 Tbsp unsalted butter, room temperature
- 1 cup light brown sugar, packed
- 1 large egg, room temperature
- 1 tsp vanilla extract
- 1/2 cup buttermilk, room temperature
- 1 Tbsp red gel food coloring
- 6 oz cream cheese, room temperature
- 5 Tbsp unsalted butter, room temperature
- 2 1/2 cups powdered sugar, sifted
- 2 tsp vanilla extract
Chef notes:
- Unsalted butter helps control salt.
- Room-temp eggs mix easier.
- Sift powdered sugar for smooth filling.
- Gel coloring gives rich hue.
- Cool cookies fully before filling.
How to Make It
- First, preheat the oven to 350°F (175°C). Then, line two baking sheets with parchment and draw heart guides; flip parchment so the ink faces the pan.
- Next, whisk flour, cocoa, baking powder, and salt in a medium bowl until even and airy.
- Meanwhile, cream 8 Tbsp butter in a large bowl until smooth. Add brown sugar and beat until light and fluffy. Then mix in the egg and 1 tsp vanilla.
- Now beat in buttermilk and red gel coloring. Pause to scrape the bowl; the batter should look velvety and thick.
- Then, on low speed, add the dry mix just until combined—don’t overmix or the cookies will be dense.
- Transfer batter to a piping bag and pipe hearts onto the prepared sheets, using your guides for even size.
- Bake 10–12 minutes until the edges set and a toothpick comes out with a few crumbs. Meanwhile, the kitchen will smell like warm cocoa.
- Cool on the pan 10 minutes, then transfer to a wire rack to cool completely; the tops should spring back slightly when done.
- For the filling, beat cream cheese, 5 Tbsp butter, and 2 tsp vanilla until smooth. Gradually add powdered sugar and beat until light and fluffy.
- Finally, pair cookies by size, pipe filling onto the flat side of one cookie, and top with its match. Press gently, then chill briefly to set.
Kitchen Tips (From My Kitchen)
- Time-saver: Pipe all batter at once on a tray, then bake sheets back-to-back for steady timing.
- Common mistake: Overbaking dries them out; pull when edges set and centers still springy.
- Simple variation: Fold in 1 Tbsp orange zest to the filling for a bright twist.
Serving Ideas
- Serve warm at brunch with coffee for a simple treat.
- Offer at holiday parties; garnish with crushed candy canes or cocoa.
- Pack for a picnic—place between parchment to prevent sticking.
- For a quick dessert, add a scoop of vanilla ice cream on the side.
Storing & Leftovers
- Fridge: Store in an airtight container for 3–4 days.
- Freezer: Freeze assembled pies up to 2 months; thaw in fridge.
- Reheat: Let sit at room temp 15 minutes; avoid microwaving or they’ll get soggy.
Leftover idea: Chop and fold into plain yogurt for a quick dessert bowl.

Red Velvet Whoopie Pies
Ingredients
Method
- Preheat the oven to 350°F (175°C). Line two baking sheets with parchment and draw heart guides; flip so the ink faces the pan.
- In a medium bowl, whisk together flour, cocoa, baking powder, and salt until even and airy.
- In a large bowl, cream the 8 Tbsp of butter until smooth. Add the brown sugar and beat until light and fluffy.
- Mix in the egg and 1 tsp of vanilla, followed by the buttermilk and red gel coloring. Scrape the bowl and ensure the batter looks velvety and thick.
- On low speed, add the dry mixture until just combined; do not overmix.
- Transfer the batter to a piping bag and pipe hearts onto the prepared sheets.
- Bake for 10-12 minutes until the edges are set and a toothpick comes out with a few crumbs.
- Cool on the pan for 10 minutes, then transfer to a wire rack to cool completely.
- In a bowl, beat the cream cheese, 5 Tbsp of butter, and 2 tsp of vanilla until smooth.
- Gradually add the powdered sugar, beating until light and fluffy.
- Pair the cookies by size, pipe filling onto one cookie, and top with its match. Press gently and chill briefly to set.
Notes
FAQs
Q: Can I make these ahead?
A: Yes. You can bake cookies a day ahead and keep them airtight in the fridge; assemble the day you serve.
Q: Can I swap ingredients?
A: You can use regular milk thinned with 1 tsp lemon juice for buttermilk, but use gel dye for the best red color.
Q: How do I know they’re done?
A: They’re ready when edges set and a light touch makes the top spring back.
Q: Can I freeze Red Velvet Whoopie Pies?
A: Absolutely; freeze unfilled cookies or fully assembled pies for up to 2 months, then thaw in the fridge.
Final Thoughts
Give these a try on a rainy afternoon. They feel fancy but come together without fuss, and they’re easy to tweak—add zest, spice, or swap shapes. I hope these little hearts make your kitchen hum the way they do mine; enjoy every bite of Red Velvet Whoopie Pies.
Conclusion
For extra inspiration, check this Sally’s Baking Addiction Red Velvet Whoopie Pies recipe for technique ideas, and see a matching take at Brown Eyed Baker’s Red Velvet Whoopie Pies with Cream Cheese Filling for more filling tips.


Leave a comment