


Introduction
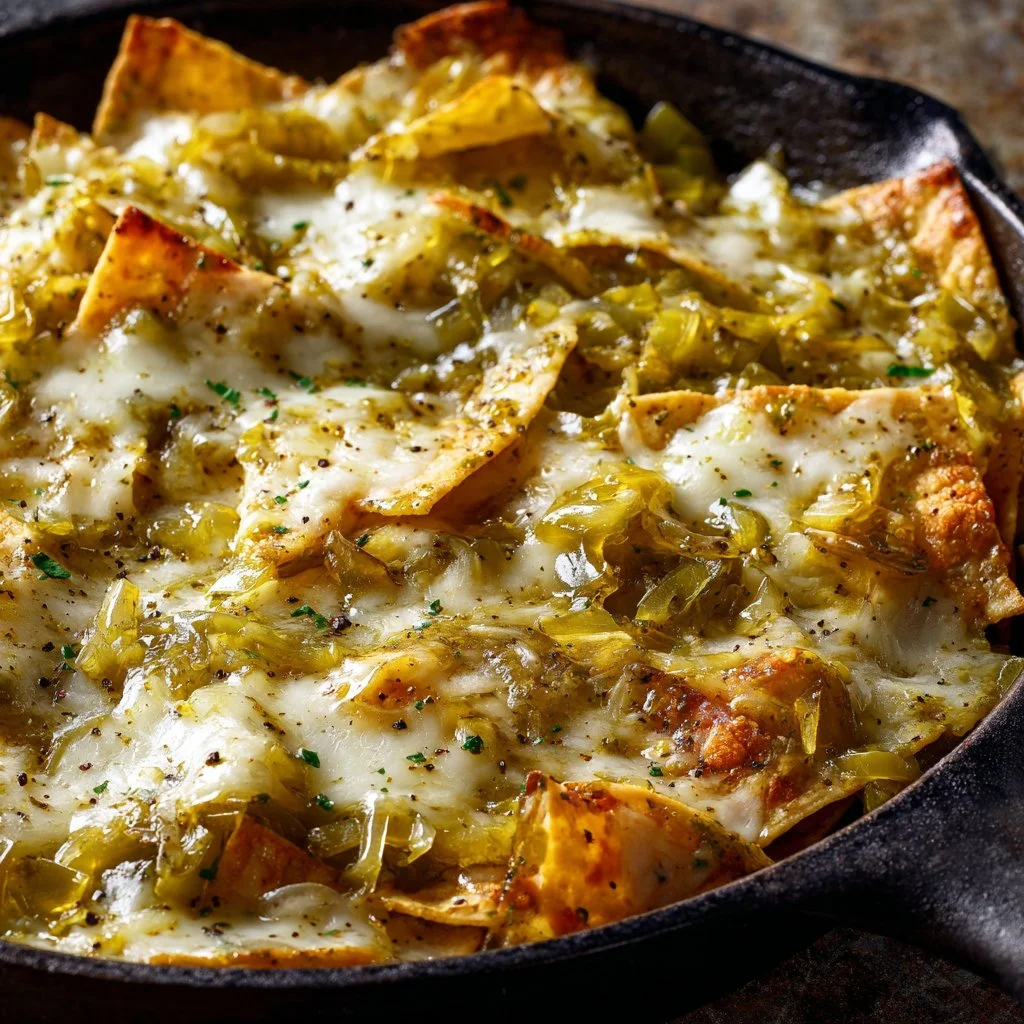
The house smells like caramelized onion and roasted chiles; the cheese bubbles and sighs as I slide the baking dish onto the table. First, a confession: my Green Chile & Extra Cheese Chilaquiles always take me back to Sunday dinners. Then, I fry an egg for each plate and listen to the gentle crack of yolks breaking into warm chips. Also, if you love a peppery fried egg on top, try my scrambled eggs with lime and green chiles for a similar bright note.
Why You’ll Love This
- Fast comfort: ready in about 35 minutes.
- Crowd-pleaser: kids and adults both reach for seconds.
- Budget-friendly: pantry staples shine here.
- Flexible: add eggs, meat, or extra heat easily.
Quick Recipe Snapshot
- Servings: 4
- Prep time: 10 minutes
- Cook time: 25 minutes
- Total time: 35 minutes
- Skill level: Easy
- Taste: savory + tangy with melty cheese
After one go, you’ll feel confident building layers and tweaking heat.
Ingredients You’ll Need
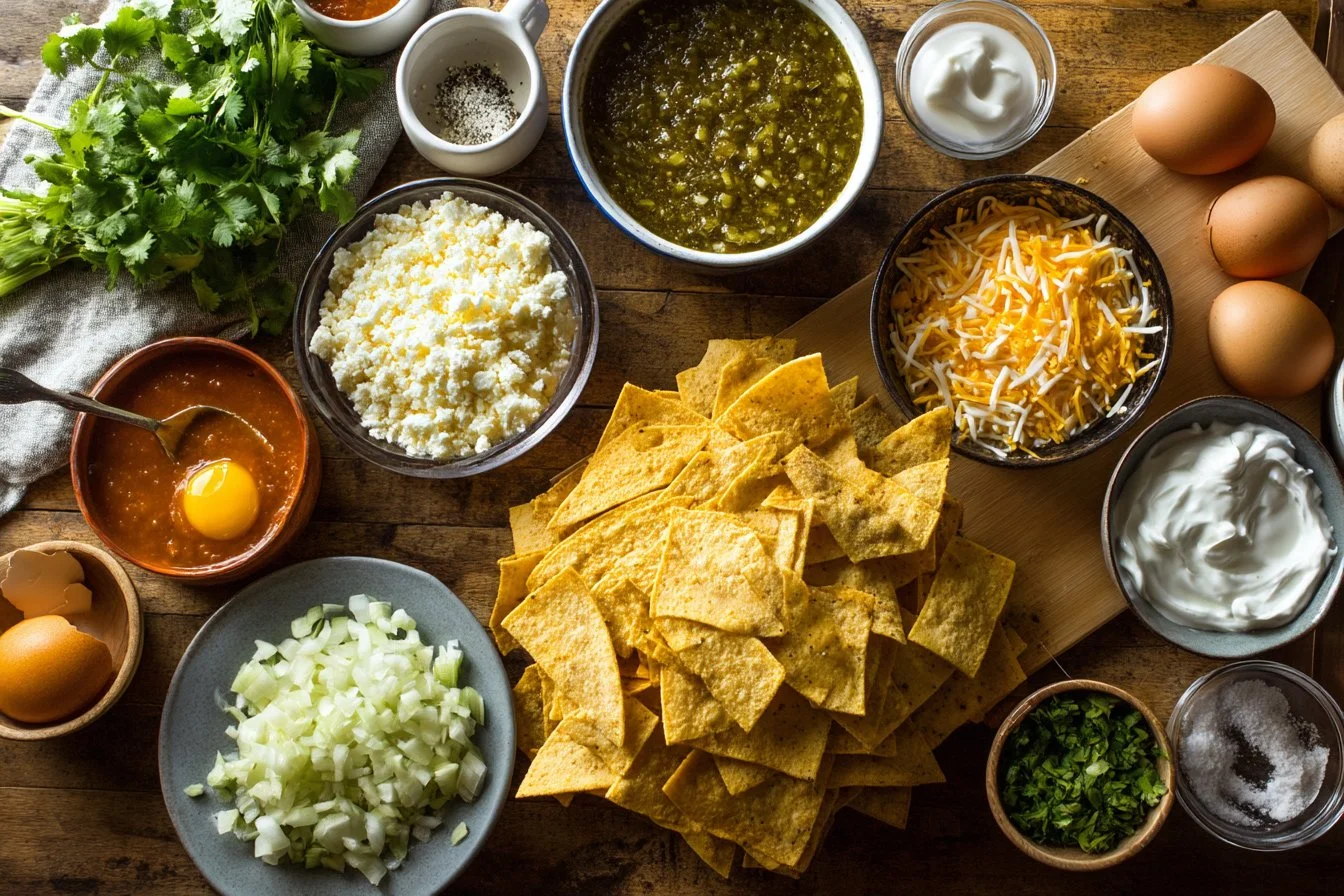
- 8 cups thick, sturdy tortilla chips
- 2 cups green chile sauce (homemade or store-bought) — Chef note: roasted tastes best
- 1 1/2 cups shredded Monterey Jack cheese — Chef note: melts evenly
- 1 cup shredded mozzarella cheese — Chef note: gets stretchy and golden
- 1/2 cup queso fresco (optional) — Chef note: crumbly, bright finish
- 1/2 cup diced green chiles (fresh or canned) — Chef note: mild or hot both work
- 1/2 small onion, thinly sliced — Chef note: sweet when sautéed until soft
- 2 tablespoons olive oil — Chef note: neutral, smoky if you like
- 1/2 teaspoon garlic powder — Chef note: quick garlic lift
- 1/2 teaspoon black pepper — Chef note: freshly cracked if possible
- 4 eggs (optional) — Chef note: fried or poached over-easy
- Fresh cilantro, for garnish — Chef note: bright herbal finish
- Sour cream, for serving (optional) — Chef note: cools the heat
How to Make It
- First, preheat the oven to 375°F (190°C) and pull out a medium baking dish. You want a hot oven so cheese browns quickly.
- Next, heat 2 tablespoons olive oil in a large skillet over medium. Then add the thinly sliced onion and sauté until soft and slightly translucent; you’ll smell the sweetness.
- Then, pour in 2 cups green chile sauce and add the diced green chiles. Stir as the mixture simmers and thickens a little; you’ll hear a gentle sizzle.
- Meanwhile, in your baking dish layer half the tortilla chips in an even layer. Then spoon half the chile sauce mixture over the chips so every chip gets a little saucy.
- Next, sprinkle half the Monterey Jack and mozzarella cheeses across the top. Also add a light dusting of garlic powder and black pepper. Repeat the layers with the remaining chips, sauce, and cheeses.
- Then, slide the pan into the oven and bake for 15–20 minutes, until the cheese bubbles and the edges turn golden brown; the top should look glossy and slightly blistered when done.
- Meanwhile, if using eggs, fry them in a small skillet to your liking—sunny-side up or over-easy both work; the yolk becomes the saucy finish.
- Finally, remove the chilaquiles, top with fried eggs, crumble queso fresco if using, and scatter fresh cilantro. Serve immediately with a dollop of sour cream if desired.
Kitchen Tips (From My Kitchen)
- Time-saver: Use store-bought green chile sauce to cut prep in half.
- Common mistake + fix: If chips go soggy, bake uncovered at high heat to crisp edges back up.
- Simple variation: Stir smoked paprika or chipotle into the sauce for smoky heat.
Serving Ideas
- Weeknight dinner: Serve with a simple green salad and lime wedges.
- Brunch showstopper: Add chorizo or sautéed mushrooms, then top with extra cilantro.
- Cozy weekend: Pair with warm refried beans and a glass of cold milk.
Also try a side of pickled onions or avocado slices for contrast, and consider pairing with my twist on a beef and cheese french toast sandwich for a fun mash-up.
Storing & Leftovers
- Fridge: Store in an airtight container for 3–4 days.
- Freezer: Not ideal; freezes okay for 1 month but texture will change.
- Reheat: Warm in a 350°F oven until edges re-crisp, about 8–10 minutes.
Leftover idea: Roll warmed chilaquiles into a breakfast burrito for a quick meal.
Green Chile & Extra Cheese Chilaquiles
Ingredients
Method
- Preheat the oven to 375°F (190°C) and pull out a medium baking dish.
- Heat 2 tablespoons olive oil in a large skillet over medium heat. Add the thinly sliced onion and sauté until soft and slightly translucent.
- Pour in 2 cups green chile sauce and add the diced green chiles. Stir as the mixture simmers and thickens.
- In your baking dish, layer half the tortilla chips evenly.
- Spoon half the chile sauce mixture over the chips.
- Sprinkle half the Monterey Jack and mozzarella cheeses on top, along with a dusting of garlic powder and black pepper.
- Repeat the layers with the remaining chips, sauce, and cheeses.
- Slide the pan into the oven and bake for 15–20 minutes, until the cheese bubbles and the edges turn golden brown.
- If using eggs, fry them in a small skillet to your liking.
- Remove the chilaquiles, top with fried eggs, crumble queso fresco if using, and scatter fresh cilantro.
- Serve immediately with a dollop of sour cream if desired.
Notes
FAQs
Q: Can I make this ahead?
A: Yes. Assemble up to the baking step, cover, and chill for up to 24 hours; then bake straight from the fridge, adding a few extra minutes.
Q: What can I substitute for Monterey Jack?
A: Try pepper jack for heat or a mild cheddar for sharper flavor—both melt well. Also, if you like a richer base, add sautéed mushrooms or shredded chicken.
Q: How do I know when it’s done?
A: The cheese must be bubbly and golden at the edges; the sauce should simmer at the sides and smell fragrant.
Q: Can I freeze Green Chile & Extra Cheese Chilaquiles?
A: You can freeze a fully baked pan, but chips soften; I recommend freezing just the sauce and chips separately for best texture—reheat together later for fresher bites.
Final Thoughts
I make these when I want something simple that still feels like a treat—cheesy, tangy, and comforting in every bite. Also, tweak the heat and eggs to match your mood, and enjoy the way friends and family gather around the pan. Give them a try, and let me know how your Green Chile & Extra Cheese Chilaquiles turn out.
Conclusion
If you want more chilaquiles techniques and ideas, I like the way Cookie and Kate’s chilaquiles verdes handle baked tortilla chips. Also, for a deeper stroll through classic technique, check out Rick Bayless’ chilaquiles master recipe.


Leave a comment