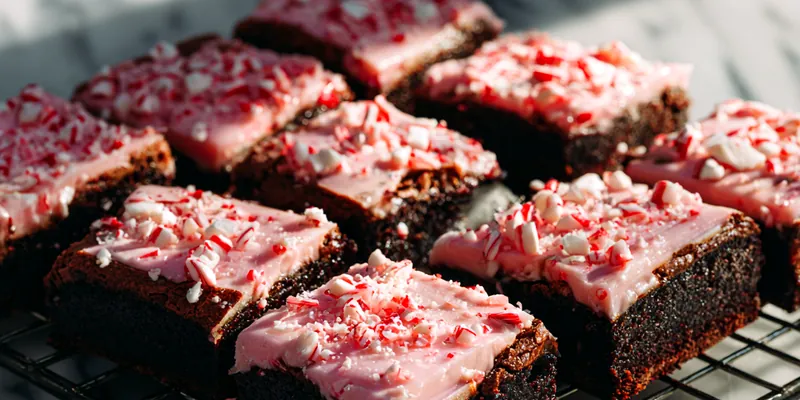
Peppermint Chocolate Brownies with Pink Candy Glaze
These peppermint chocolate brownies combine rich, fudgy chocolate with refreshing peppermint flavor and a festive pink glaze. The perfect balance of minty freshness and deep chocolate makes them an irresistible holiday treat that disappears quickly at parties.

The Secret to Perfectly Fudgy Peppermint Brownies
The key to achieving that coveted fudgy texture lies in the precise ratio of fat to flour and avoiding overbaking. Unlike cakey brownies that use more flour and leavening agents, fudgy brownies rely on a higher proportion of butter and eggs to create that dense, moist interior. The melted butter creates a smooth batter that bakes into a rich, almost truffle-like consistency. When combined with the right amount of cocoa powder, you get intense chocolate flavor without any dryness.
The peppermint extract in these brownies is carefully measured to complement rather than overpower the chocolate. Too much peppermint can create a toothpaste-like flavor, while too little gets lost in the rich chocolate. Starting with just half a teaspoon in the brownie base provides a subtle minty undertone, while the glaze delivers a more pronounced peppermint punch. This layered approach to flavoring creates complexity and keeps each bite interesting.
💡 Professional Tip
Always use room temperature eggs for brownies - they incorporate more smoothly into the batter and create a more uniform texture. Cold eggs can cause the melted butter to solidify in spots, leading to an uneven bake.
Frequently Asked Questions
Yes, these brownies actually improve after a day. Bake and glaze them up to 3 days before serving, storing in an airtight container at room temperature. The flavors meld together beautifully, and the texture becomes even more fudgy. If making further ahead, freeze unglazed brownies for up to 3 months, then thaw and add the glaze before serving.
Absolutely! For a different holiday flavor, try using orange extract or espresso powder instead of peppermint. Almond extract creates a sophisticated variation, or you can simply use extra vanilla extract for classic chocolate brownies. Adjust the glaze flavoring to match your extract choice.
Cakey brownies typically result from overbaking or too much flour. Make sure to measure flour correctly by spooning it into the measuring cup rather than scooping directly from the bag. Also, pull the brownies from the oven when the center still looks slightly underdone - they'll continue cooking as they cool. A toothpick should have moist crumbs, not come out completely clean.
Natural unsweetened cocoa powder works perfectly for this recipe and provides a classic chocolate flavor. Dutch-process cocoa creates a darker color and milder flavor, which also works well. Avoid hot cocoa mixes or sweetened cocoa powders as they contain added sugar and milk powder that will throw off the recipe balance.
Insert a toothpick about 2 inches from the edge of the pan - it should come out with a few moist crumbs attached, not wet batter or completely clean. The edges will look set and may pull slightly away from the pan, while the center should still appear slightly shiny and soft. Remember that brownies continue to set as they cool.
These brownies are delicious on their own, but pair beautifully with vanilla ice cream or freshly whipped cream. For an elegant presentation, serve with hot chocolate or peppermint coffee. They're also wonderful alongside a cheese platter with mild brie or mascarpone to balance the sweetness.
Certainly! You can dust them with powdered sugar instead, drizzle with melted dark chocolate, or serve them plain. For a simpler peppermint topping, melt white chocolate with a little peppermint extract and spread that over the cooled brownies before adding the crushed candy canes.
Store brownies in an airtight container at room temperature for up to 5 days. Layer parchment paper between stacked brownies to prevent the glaze from sticking. For longer storage, freeze individual brownies wrapped in plastic wrap and placed in a freezer bag for up to 3 months. Thaw at room temperature for about an hour before serving.
Recipe Troubleshooting Guide
Glaze Too Thick or Too Thin
Problem: The peppermint glaze doesn't spread smoothly or runs off the brownies completely
Solution: For thick glaze, add milk one teaspoon at a time until you reach a pourable but not watery consistency. For thin glaze, add more powdered sugar a tablespoon at a time. The glaze should slowly flow off a spoon but not be runny like water.
Brownies Stuck to Pan
Problem: Brownies break apart when trying to remove them from the pan
Solution: Always line your pan with parchment paper with overhang on at least two sides. This creates handles for lifting the entire brownie slab out. Let brownies cool completely before attempting to remove - warm brownies are more fragile. If stuck, run a knife around the unlined edges first.
Cracked Top Surface
Problem: The brownie top developed large cracks during baking
Prevention: Cracks usually indicate overmixing the batter or too high oven temperature. Mix just until ingredients are combined, and verify your oven temperature with an oven thermometer. Some light cracking is normal and doesn't affect the taste, and will be covered by the glaze anyway.
Peppermint Flavor Too Strong or Weak
Problem: The peppermint taste is overwhelming or barely noticeable
Recovery: Peppermint extract brands vary in intensity. Start with the recipe amount, but taste your glaze before adding it to the brownies and adjust as needed. For milder flavor, reduce extract to 1/4 teaspoon. For stronger mint, increase to 1/2 teaspoon in the glaze, but add gradually.
Candy Cane Topping Melting
Problem: The crushed candy canes are dissolving into the glaze
Prevention: Candy canes are hygroscopic and absorb moisture. Add them immediately after glazing so they can set with the glaze. If storing for more than a day, add fresh crushed candy canes just before serving. Store extra candy separately in an airtight container with a silica packet.
Flavor Balance Issues
Too Sweet: If brownies taste too sweet, balance with a pinch of sea salt sprinkled on the glaze or reduce the glaze layer. The contrast enhances the chocolate flavor.
Too Salty: Too much salt in the brownie batter can overwhelm other flavors. If this happens, increase the peppermint in the glaze slightly to provide more flavor complexity.
Bland: If the chocolate flavor seems weak, add 1-2 tablespoons of espresso powder to the dry ingredients next time. It intensifies chocolate without adding coffee flavor.
Selecting Quality Ingredients for Maximum Flavor
The chocolate flavor in these brownies comes entirely from cocoa powder, making quality crucial. Choose a high-fat cocoa powder (at least 20-22% cocoa butter) for the richest taste and smooth texture. Brands matter here - Dutch-process cocoa gives a darker color and mellower flavor, while natural cocoa provides brighter, more acidic chocolate notes. Both work well, so choose based on your preference. Store cocoa powder in an airtight container away from moisture to prevent clumping and preserve freshness.
Butter quality directly impacts the brownie's flavor and texture. Use real unsalted butter rather than margarine or spreads, which contain water and emulsifiers that can affect the final texture. European-style butter with higher fat content creates even richer brownies. For the peppermint extract, pure extract yields better flavor than imitation, though both work. When selecting candy canes for topping, choose peppermint rather than wintergreen varieties, and crush them just before using to prevent them from becoming sticky.
Essential Ingredient Notes
- Unsweetened Cocoa Powder: Look for cocoa powder with at least 20% cocoa butter content for rich flavor. Dutch-process creates darker brownies with mellow flavor, while natural cocoa gives brighter chocolate taste. Sift before using to eliminate lumps that create dry spots in brownies.
- Peppermint Extract: Pure peppermint extract provides cleaner flavor than imitation. Start with less than you think you need - you can always add more to the glaze. Different brands vary in strength, so taste as you go. Store in a cool, dark place as heat and light degrade essential oils.
- Candy Canes: Use traditional peppermint candy canes rather than novelty flavors. Crush them in a sealed plastic bag with a rolling pin for the perfect texture - not powder, but small pieces with some larger shards for visual interest. Fresher candy canes crush more easily than stale ones.
Mastering the Technique for Fudgy Perfection
The mixing method for brownies differs significantly from cakes. While cakes benefit from creaming butter and sugar with air, brownies achieve their dense texture through gentle folding. After whisking the wet ingredients, use a rubber spatula to fold in the dry ingredients with deliberate, sweeping motions. Stop mixing the moment you no longer see flour streaks - overmixing develops gluten and creates tough, cakey brownies. The batter should look thick, smooth, and glossy like ganache.
Baking temperature and timing require attention for optimal results. A 350°F oven provides steady, even heat that bakes the edges without overcooking the center. The brownies are done when the edges are set and pull slightly from the pan, while the center still jiggles slightly when gently shaken. This seems underdone, but the residual heat continues cooking them as they cool, creating that perfect fudgy interior. Cutting brownies while warm leads to messy pieces - patience yields clean cuts with beautiful layers visible.
The Perfect Glaze Consistency
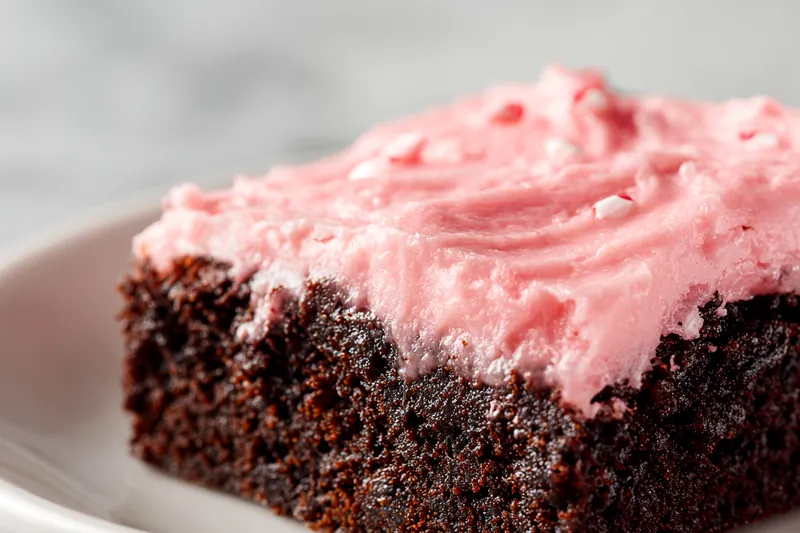
Creating the ideal glaze texture is about finding the balance between too thick and too thin. Start with the powdered sugar and add milk gradually, whisking constantly. The glaze should flow slowly off your whisk, similar to thick cream. If you lift the whisk and the glaze immediately disappears back into the bowl, it's too thin. If it barely moves, it's too thick. The right consistency coats the brownies smoothly without pooling excessively around the edges. Food coloring is easier to blend into slightly thinner glaze, so add color before final consistency adjustments.
Peppermint Chocolate Brownies with Pink Candy Glaze
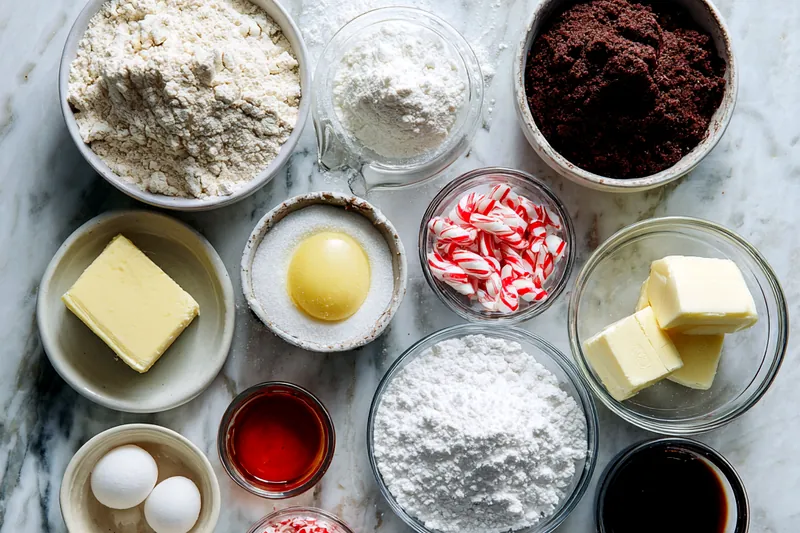
📋 Ingredients
Brownie Base
- 2 cups powdered sugarSifted for smooth glaze without lumps
- 3 tablespoons whole milkRoom temperature blends more smoothly
- 1/4 teaspoon peppermint extractPure extract recommended for best flavor
- 2-3 drops pink food coloringGel color gives more vibrant results
- 1/2 cup crushed candy canesCrush just before using to prevent stickiness
Peppermint Glaze & Topping
- 1 cup unsalted butter, meltedEuropean-style butter adds richness
- 2 cups granulated sugarCreates the shiny, crackly top
- 4 large eggs, room temperatureRoom temp eggs blend smoothly without lumps
- 1 teaspoon vanilla extractPure vanilla enhances chocolate flavor
- 1/2 teaspoon peppermint extractSubtle mint undertone in brownie base
- 3/4 cup unsweetened cocoa powderSift to remove lumps before adding
- 1 cup all-purpose flourSpoon and level for accurate measurement
- 1/2 teaspoon saltEnhances chocolate and balances sweetness
- 1/4 teaspoon baking powderCreates slight lift without making cakey
Instructions
Prepare Pan and Mix Wet Ingredients
Preheat oven to 350°F and line a 9x13 inch baking pan with parchment paper, leaving overhang for easy removal. In a large bowl, whisk together melted butter and sugar until well combined. Add eggs one at a time, beating well after each addition, then stir in vanilla and peppermint extracts.
Combine Dry Ingredients
In a separate bowl, sift together cocoa powder, flour, salt, and baking powder. Gradually fold the dry ingredients into the wet mixture using a spatula, stirring just until no flour streaks remain. Do not overmix to ensure fudgy texture.
Bake the Brownies
Pour batter into prepared pan and spread evenly. Bake for 25-28 minutes until a toothpick inserted 2 inches from the edge comes out with just a few moist crumbs. The center should still look slightly underdone. Cool completely in the pan on a wire rack.
Make Peppermint Glaze
In a medium bowl, whisk together powdered sugar, milk, and peppermint extract until smooth. Add 2-3 drops of pink food coloring and mix until you achieve your desired shade. The glaze should be pourable but not too thin.
Glaze and Decorate
Once brownies are completely cool, pour the pink peppermint glaze over the top, spreading evenly with an offset spatula. Immediately sprinkle with crushed candy canes while glaze is still wet. Let glaze set for 30 minutes before cutting into 16 squares.
Recipe Notes & Tips
Storage
Store brownies in an airtight container at room temperature for up to 5 days, or freeze unglazed brownies for up to 3 months. Layer parchment between stacked brownies to prevent glaze from sticking. Add fresh candy cane topping if stored longer than 2 days.
Serving Suggestions
Serve at room temperature for best fudgy texture. Pair with vanilla ice cream, whipped cream, or hot peppermint cocoa. These brownies make excellent gifts when wrapped individually in cellophane bags tied with festive ribbon.
Variations
For darker brownies, use Dutch-process cocoa. Add 1/2 cup chocolate chips to the batter for extra richness. Replace peppermint with orange extract and use white chocolate glaze for a chocolate-orange variation. For adults, add 1 tablespoon of peppermint schnapps to the glaze.