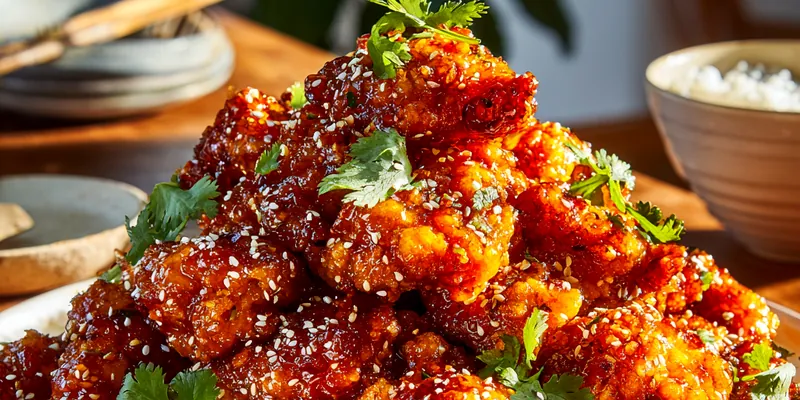
Crispy Orange Chicken - Better Than Takeout
This Crispy Orange Chicken rivals any restaurant version with its perfectly crunchy coating and vibrant, glossy orange sauce. The secret lies in the double coating technique and fresh orange juice that creates that addictive sweet-tangy flavor. In just 30 minutes, you'll have a takeout favorite that's fresher, healthier, and more delicious than delivery.

Why This Orange Chicken Recipe Works
The magic of exceptional orange chicken lies in achieving the perfect balance between crispy texture and saucy coating. This recipe uses a specific flour-to-cornstarch ratio that creates an ultra-crunchy exterior that stays crisp even after saucing. The cornstarch acts as a moisture barrier, while the flour provides structure and golden color. Using chicken thighs instead of breast meat ensures juicy, flavorful results that won't dry out during frying.
Fresh orange juice makes all the difference in this recipe, providing natural sweetness and vibrant flavor that bottled sauces simply can't match. The orange zest adds aromatic oils that intensify the citrus notes without extra liquid. By controlling the sauce consistency with a cornstarch slurry, you create that signature glossy coating that clings to each piece perfectly. The result is restaurant-quality orange chicken with brighter, fresher flavors than takeout.
💡 Professional Tip
The secret to maintaining crispiness is coating the chicken in sauce right before serving, not letting it sit. If making ahead, keep fried chicken and sauce separate until the last moment.
Frequently Asked Questions
You can prepare components ahead: fry the chicken up to 2 hours in advance and keep warm in a 200°F oven, and make the sauce up to 24 hours ahead and refrigerate. However, only combine them right before serving to maintain the crispy texture. Reheat the sauce gently on the stovetop before tossing with chicken. For best results, fry the chicken fresh and have everything else prepped and ready.
Yes, you can substitute chicken breast, but thighs are recommended for their superior flavor and moisture. If using breast, be extra careful not to overcook, as it dries out faster. Cut breast meat slightly larger (about 2 inches) since it shrinks more during cooking. Reduce frying time to 3-4 minutes and check internal temperature reaches 165°F. The texture will be slightly less tender than thighs.
Neutral oils with high smoke points work best: vegetable oil, canola oil, or peanut oil are ideal choices. Avoid olive oil or butter as they'll burn at frying temperatures. You need enough oil for the chicken to float freely (about 2-3 inches deep). The oil can be strained and reused once or twice if you let it cool completely and store it properly in a sealed container.
Yes, though the texture won't be quite as crispy. Coat chicken as directed, place on a wire rack over a baking sheet, spray with cooking oil, and bake at 425°F for 20-25 minutes, flipping halfway. You can also use an air fryer at 400°F for 12-15 minutes, shaking the basket halfway through. Both methods use less oil but produce a slightly different texture than traditional frying.
Chicken is done when it reaches an internal temperature of 165°F and the coating is deep golden brown. The chicken should feel firm when pressed with tongs, and the coating should look crispy and dry, not pale or soggy. When you remove a piece, it should sizzle actively and maintain its golden color. If oil temperature drops below 325°F, the coating will absorb oil and become greasy instead of crispy.
Steamed jasmine or white rice is the classic pairing that soaks up the delicious sauce. Add steamed broccoli, snap peas, or bok choy for vegetables. Fried rice makes it a complete meal. For a lighter option, serve over cauliflower rice or with a crisp Asian slaw. Egg rolls, pot stickers, or spring rolls make great appetizers alongside this dish for a full Chinese-American feast.
Absolutely! Start with 3 tablespoons of honey instead of 1/4 cup for less sweetness, then taste and adjust. Add more rice vinegar (up to 3 tbsp total) for extra tanginess. For a spicier version, add red pepper flakes or sriracha to the sauce. Some prefer adding a tablespoon of brown sugar for deeper molasses notes. The sauce is very forgiving and can be customized to your taste preference.
Store chicken and sauce separately in airtight containers in the refrigerator for up to 3 days. The coating will soften when refrigerated. To reheat, place chicken on a wire rack over a baking sheet and warm in a 375°F oven for 8-10 minutes until heated through and coating crisps up slightly. Reheat sauce separately in a small pan. Avoid microwaving as it makes the coating soggy. Freeze fried chicken (before saucing) for up to 1 month.
Recipe Troubleshooting Guide
Soggy Coating
Problem: The breading turns soggy instead of staying crispy after adding sauce.
Solution: This happens when chicken isn't dried thoroughly before coating, oil temperature is too low, or chicken sits in sauce too long. Always pat chicken completely dry, maintain oil at 350°F, and toss with sauce immediately before serving. If making ahead, keep components separate and combine only when ready to eat.
Greasy Chicken
Problem: Fried chicken tastes oily and heavy rather than light and crispy.
Solution: Oil temperature is the culprit. If oil is below 325°F, coating absorbs oil instead of crisping. Use a thermometer to monitor temperature and let oil reheat between batches. Don't overcrowd the pan, which drops temperature quickly. Drain fried chicken on a wire rack instead of paper towels to prevent steam from making it soggy.
Burnt Coating
Problem: The outside burns before chicken cooks through.
Prevention: Oil is too hot (above 375°F). Lower heat and use a thermometer to maintain 350°F. Cut chicken into uniform 1.5-inch pieces so they cook evenly. If coating darkens too quickly, remove chicken and let finish cooking in a 350°F oven for 5 minutes while oil temperature adjusts.
Sauce Too Thin
Problem: Orange sauce won't thicken and stays watery.
Recovery: Make sure to mix cornstarch thoroughly with cold water before adding to hot sauce - lumpy slurry won't thicken properly. Let sauce simmer for a full 2-3 minutes after adding slurry to activate the cornstarch. If still thin, mix another teaspoon of cornstarch with 2 teaspoons water and add gradually while stirring. Sauce will thicken more as it cools.
Coating Falls Off
Problem: Breading separates from chicken during or after frying.
Prevention: Chicken must be completely dry before coating. Press flour mixture firmly onto egg-dipped chicken and let rest 5 minutes before frying so coating adheres. Don't move chicken for the first 2 minutes in oil - this sets the coating. If coating still falls off, add a tablespoon of cornstarch to the egg wash for extra binding power.
Flavor Balance Issues
Too Sweet: If too sweet, add 1-2 teaspoons more rice vinegar and a pinch of salt to balance. A squeeze of fresh lime also cuts sweetness.
Too Salty: If too salty, increase honey by 1 tablespoon and add 2 tablespoons more orange juice to dilute. Adding a pinch of sugar also helps.
Bland: If bland, add more orange zest (up to 2 tbsp), a teaspoon of grated ginger, or a splash more soy sauce. Fresh garlic also boosts flavor significantly.

Choosing the Right Ingredients
Quality ingredients make a noticeable difference in this recipe. Boneless, skinless chicken thighs are preferred over breasts because their higher fat content keeps the meat juicy and flavorful even with high-heat cooking. Look for thighs that are similar in size for even cooking. If you can only find chicken breasts, choose organic or air-chilled varieties which retain more moisture and have better texture.
Fresh orange juice is non-negotiable for authentic flavor - bottled juice and artificial orange flavoring simply can't compare to the bright, natural taste of fresh citrus. Use navel or Valencia oranges for the best balance of sweetness and acidity. The orange zest contains essential oils that provide intense orange flavor without adding extra liquid. For the coating, all-purpose flour creates structure while cornstarch adds that signature Asian-restaurant crispiness. Don't substitute potato starch or tapioca starch as they behave differently when fried.
Essential Ingredient Notes
- Chicken Thighs: Choose thighs that are uniform in thickness for even cooking. Trim excess fat but leave some for flavor. Dark meat stays juicier than breast during high-heat cooking and provides richer taste. If frozen, thaw completely in refrigerator and pat very dry before using.
- Fresh Orange Juice: Squeeze oranges just before cooking for maximum freshness. You'll need about 2-3 medium oranges for 1/2 cup juice. Room temperature oranges yield more juice - roll them on the counter before cutting. Strain out pulp if you prefer a smoother sauce, or leave it in for rustic texture.
- Cornstarch: Cornstarch creates the ultra-crispy coating that's lighter than pure flour. It also prevents gluten development, keeping the coating tender. When making the slurry for sauce, always mix with cold water and stir well to prevent lumps. Fresh cornstarch works best - old cornstarch loses its thickening power.
Mastering the Frying Technique
Perfect frying is all about temperature control. Heat oil to exactly 350°F before adding chicken - use a thermometer rather than guessing. When chicken hits the oil, temperature will drop, so adjust heat to maintain 325-350°F throughout cooking. Fry in small batches (4-5 pieces at a time) so temperature stays consistent. Overcrowding lowers temperature too much, resulting in greasy, soggy chicken. Each batch takes 4-5 minutes, and chicken should float when fully cooked with a deep golden color.
The coating technique determines crispiness. First, ensure chicken is bone-dry by patting with paper towels - moisture is the enemy of crispiness. Dip each piece in beaten egg, then press firmly into the flour-cornstarch mixture, making sure every surface is coated. Let coated chicken rest for 5 minutes before frying so the coating adheres better. When adding to oil, slide pieces in gently to avoid splashing. Don't touch them for the first 2 minutes - this allows the coating to set. Turn only once, after 3 minutes, for even browning.
Double-Coating Method
For extra crunch, dip chicken in egg, dredge in flour mixture, dip in egg again, then coat with flour mixture a second time. This creates a thicker, crunchier coating that holds up exceptionally well to sauce. The double layer also creates more texture and protects the meat from drying out.
Crispy Orange Chicken - Better Than Takeout
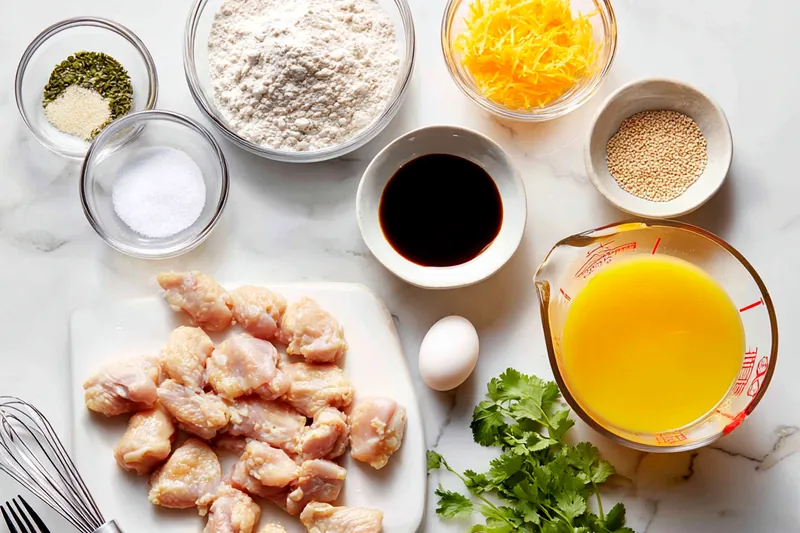
📋 Ingredients
For the Chicken
- 1/2 cup fresh orange juiceFreshly squeezed from 2-3 oranges - bottled juice won't give the same bright flavor
- 1 tbsp orange zestZest oranges before juicing; use a microplane for finest texture
- 1/4 cup soy sauceRegular or low-sodium works; low-sodium gives you more control over saltiness
- 1/4 cup honeyProvides sweetness and helps create glossy texture; can reduce to 3 tbsp for less sweet
- 2 tbsp rice vinegarAdds tang to balance sweetness; white vinegar works in a pinch
- 2 cloves garlic, mincedFresh garlic essential for depth of flavor
- 1 tsp fresh ginger, gratedUse a microplane or fine grater; adds warmth and complexity
- 1 tbsp cornstarch + 2 tbsp waterMix into a slurry before adding to sauce; thickens sauce to perfect consistency
For the Orange Sauce
- 1.5 lbs boneless, skinless chicken thighsCut into 1.5-inch pieces; thighs stay juicier than breast meat
- 1 large egg, whiskedRoom temperature egg coats better than cold
- 1/2 cup all-purpose flourProvides structure and golden color to coating
- 1/4 cup cornstarchSecret to ultra-crispy coating; don't substitute
- 1/2 tsp saltSeasons the coating from the inside out
- 1/4 tsp black pepperFreshly ground pepper adds subtle heat
- 2-3 cups neutral oil for fryingVegetable, canola, or peanut oil; needs high smoke point
- Sesame seeds and cilantro for garnishOptional but adds authentic restaurant appearance and fresh flavor
Instructions
Prepare the Chicken
Cut chicken thighs into bite-sized pieces approximately 1.5 inches. Pat completely dry with paper towels - this step is crucial for achieving maximum crispiness. In a medium bowl, whisk the egg until well combined. In a separate shallow dish, mix together flour, cornstarch, salt, and black pepper. Set up your dredging station with chicken, egg bowl, and flour mixture in a row for efficient coating.
Coat and Fry the Chicken
Heat 2-3 inches of oil in a deep pan or wok to 350°F (use a thermometer for accuracy). Working in batches, dip each chicken piece in the whisked egg, allowing excess to drip off, then press into the flour mixture, coating all sides thoroughly. Carefully slide 4-5 pieces into the hot oil, being careful not to overcrowd. Fry for 4-5 minutes, turning once halfway through, until deep golden brown and internal temperature reaches 165°F. Remove with a slotted spoon and drain on a wire rack set over paper towels. Maintain oil temperature between batches.
Make the Orange Sauce
While chicken fries, prepare the sauce. In a medium saucepan over medium heat, combine fresh orange juice, orange zest, soy sauce, honey, rice vinegar, minced garlic, and grated ginger. Stir well and bring to a gentle simmer. In a small bowl, mix cornstarch with 2 tablespoons cold water until completely smooth with no lumps. Once sauce is simmering, stir the cornstarch slurry again and slowly pour it into the sauce while stirring constantly. Continue cooking for 2-3 minutes, stirring frequently, until sauce thickens to a glossy, syrupy consistency that coats the back of a spoon.
Combine and Serve
Remove sauce from heat. Immediately add all the fried chicken pieces to the pan with the orange sauce. Using tongs or a large spoon, toss gently but thoroughly to coat each piece evenly with the glossy sauce, working quickly so coating stays crisp. Transfer to a serving platter immediately. Garnish generously with sesame seeds and fresh cilantro leaves. Serve hot alongside steamed jasmine rice or your favorite side dishes. For best texture, enjoy immediately while coating is still crispy.
Recipe Notes & Tips
Storage
Store fried chicken and sauce separately in airtight containers in the refrigerator for up to 3 days. Reheat chicken in a 375°F oven on a wire rack for 8-10 minutes to restore crispiness. Warm sauce on stovetop, adding a splash of water if too thick. Fried chicken (before saucing) can be frozen for up to 1 month - reheat from frozen at 400°F for 15 minutes.
Serving Suggestions
Serve with steamed jasmine rice, fried rice, or cauliflower rice. Add steamed broccoli, snap peas, or baby bok choy for vegetables. This pairs beautifully with egg drop soup or hot and sour soup as a starter. For a complete Chinese-American feast, serve alongside egg rolls, crab rangoon, or vegetable spring rolls. Garnish the platter with orange slices and extra cilantro for restaurant-style presentation.
Variations
Make it spicy by adding 1-2 teaspoons of sriracha or red pepper flakes to the sauce. For sesame orange chicken, add 1 tablespoon of toasted sesame oil to the sauce. Try lemon chicken by substituting lemon juice and zest for orange. For a healthier version, bake coated chicken at 425°F for 20-25 minutes on a wire rack, or air fry at 400°F for 12-15 minutes, flipping halfway.