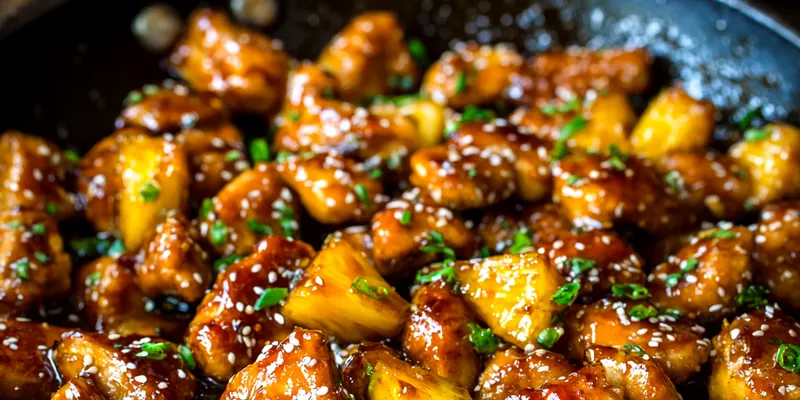
Brown Sugar Pineapple Chicken
This Brown Sugar Pineapple Chicken delivers the perfect balance of sweet and tangy flavors in a glossy, caramelized glaze that rivals your favorite takeout. Tender chicken pieces and golden pineapple chunks are coated in a sticky brown sugar sauce that's absolutely irresistible. Best of all, this restaurant-quality dish comes together in just 30 minutes, making it ideal for busy weeknights when you're craving something special without the fuss.

Why This Brown Sugar Pineapple Chicken Recipe Works
The magic of this recipe lies in the perfectly balanced sauce that achieves restaurant-quality glaze without any complicated techniques. Brown sugar provides a rich, molasses-like depth that white sugar simply can't match, creating that signature caramelized coating you see in the best Asian restaurants. The combination of soy sauce, pineapple juice, and a touch of ketchup creates a complex sweet-savory profile with just enough acidity to prevent the dish from being cloying. Many recipes fail because they don't properly reduce the sauce – our method ensures a thick, clingy glaze that coats every piece.
Texture is everything in this dish. We achieve crispy-edged chicken by cooking it first without the sauce, allowing proper browning and caramelization. This creates a flavorful foundation before the glaze is introduced. The pineapple chunks are added at the end to maintain their structural integrity while allowing the edges to caramelize slightly, adding both textural interest and concentrated sweetness. The cornstarch slurry technique ensures your sauce thickens to the perfect consistency every time – no more watery disappointments or gloppy messes.
💡 Professional Tip
The key to achieving that perfect glossy glaze is cooking the sauce just until it coats the back of a spoon, then immediately adding the chicken and pineapple. If you overcook the glaze, it will become too thick and candy-like; undercooked and it will be runny. Watch for the moment when the bubbles change from large and sporadic to small and uniform – that's your signal it's ready.
Frequently Asked Questions
Yes, you can prep the components ahead! Cut and marinate the chicken in a sealed container for up to 24 hours. You can also make the sauce base (without the cornstarch) and refrigerate it for up to 3 days. However, for best results, cook the dish fresh as the glaze loses its glossy texture when reheated. If you must make it ahead, slightly undercook the chicken and store separately from the sauce, then combine and heat together when ready to serve.
Absolutely! Fresh pineapple works wonderfully and often has better texture. Cut 2 cups of fresh pineapple into 1-inch chunks. Since you won't have the canned juice, substitute with 1/2 cup of orange juice or store-bought pineapple juice. Fresh pineapple tends to be less sweet, so taste your sauce and adjust brown sugar if needed. The fresh pineapple caramelizes even better than canned, creating delicious golden edges.
Sauce consistency depends on the cornstarch slurry and cooking time. If too thin, make an additional small slurry (1 teaspoon cornstarch + 1 teaspoon water) and add it gradually while the sauce simmers. If too thick, thin it with pineapple juice or water, one tablespoon at a time. Remember that the sauce will thicken more as it cools, so aim for a slightly thinner consistency than your target. Always mix cornstarch with cold water before adding to prevent clumping.
Yes, boneless skinless chicken thighs are an excellent substitute and many prefer them for their richer flavor and more forgiving texture. Use the same amount (1.5 lbs) and cut into similar-sized pieces. Thighs may take 2-3 minutes longer to cook through. They're also more tolerant of slight overcooking, staying juicy even if you cook them a bit longer. The extra fat in thighs also helps the glaze adhere beautifully.
The chicken is done when it reaches an internal temperature of 165°F on an instant-read thermometer and the juices run clear. Visually, the chicken should be golden brown on the outside with no pink remaining when you cut into a piece. The glaze is ready when it coats the back of a spoon and doesn't immediately run off – it should have a syrupy, honey-like consistency. The pineapple edges should just begin to show golden caramelization.
This dish pairs perfectly with steamed white or brown rice to soak up the delicious glaze. For a complete meal, serve alongside steamed broccoli, snap peas, or bok choy. Fried rice or cauliflower rice are great low-carb alternatives. For extra vegetables, stir-fried green beans, bell peppers, or a simple cucumber salad provide nice textural and flavor contrast. A sprinkle of sesame seeds and green onions adds the perfect finishing touch.
While possible, these methods won't achieve the same caramelized texture. For slow cooker: combine all ingredients except cornstarch, cook on low 3-4 hours, then thicken with cornstarch slurry. For Instant Pot: use sauté function to brown chicken, add other ingredients, pressure cook 5 minutes, then thicken sauce on sauté. However, the stovetop method is recommended for the best glaze and texture that creates that signature glossy appearance.
Store leftovers in an airtight container in the refrigerator for up to 3 days. The sauce will thicken considerably when cold. To reheat, use a skillet over medium heat with a splash of water or pineapple juice to thin the sauce back to the right consistency. Microwave reheating works but may result in tougher chicken – use 50% power and heat in 30-second intervals. The glaze won't be quite as glossy after storage, but the flavor remains excellent.
Recipe Troubleshooting Guide
Chicken Is Dry or Tough
Problem: The chicken pieces are overcooked, resulting in a dry, chewy texture that ruins the dish.
Solution: Use an instant-read thermometer and remove chicken at exactly 165°F – carryover cooking will finish it. Cut chicken into uniform 1-inch pieces so they cook evenly. Don't overcrowd the pan, which causes steaming instead of browning. If using chicken breasts, pound them to even thickness before cutting. Consider switching to chicken thighs, which are more forgiving and stay juicy even with slight overcooking.
Sauce Won't Thicken
Problem: The glaze remains thin and watery, not coating the chicken properly or achieving that signature glossy appearance.
Solution: Ensure your cornstarch is fresh – old cornstarch loses thickening power. Always mix cornstarch with COLD water before adding to hot liquid to prevent clumping. Let the sauce simmer for the full 2-3 minutes after adding the slurry. If still thin, make another small slurry and add gradually. Make sure your heat is at medium, not too low. Too much liquid from the pineapple can also thin it – drain pineapple well and measure juice precisely.
Glaze Is Too Sweet
Problem: The dish tastes overly sweet and lacks balance, making it one-dimensional and cloying.
Prevention: Reduce brown sugar to 1/3 cup for a less sweet version. Increase rice vinegar to 2 tablespoons for more acidity. Add 1/2 teaspoon of red pepper flakes for heat that cuts sweetness. Use low-sodium soy sauce and increase it by 1 tablespoon for more savory depth. A squeeze of fresh lime juice at the end brightens flavors. Taste as you go and adjust – everyone's sweetness tolerance is different.
Pineapple Is Mushy
Problem: The pineapple chunks have broken down into mush, losing their textural appeal and visual impact.
Recovery: Add pineapple only in the last 3-4 minutes of cooking – it needs just enough time to heat through and caramelize slightly. Use firm pineapple chunks, not crushed or tidbits. Drain thoroughly on paper towels before adding. Fresh pineapple holds up better than canned. Don't stir too vigorously once pineapple is added – use a gentle folding motion. If using canned, choose chunks in juice rather than syrup, which makes them softer.
Glaze Won't Stick to Chicken
Problem: The sauce pools at the bottom of the pan instead of coating the chicken in a glossy glaze.
Prevention: Pat chicken completely dry before cooking – moisture prevents glaze adhesion. Make sure chicken is properly browned before adding sauce, creating texture for the glaze to grip. Cook the glaze to the right consistency – it should coat the back of a spoon. Toss the chicken in the glaze for the full 3-4 minutes, allowing time for coating and slight evaporation. If sauce seems too thin, cook longer or add more cornstarch slurry. Remove from heat while still glossy – overcooking makes it sticky and gloppy.
Flavor Balance Issues
Too Sweet: If too sweet: Add 1-2 tablespoons rice vinegar or fresh lime juice, increase soy sauce by 1 tablespoon, or add a pinch of red pepper flakes for heat.
Too Salty: If too salty: Add 1-2 tablespoons brown sugar, squeeze in juice from half an orange, or add more pineapple chunks to dilute. Use low-sodium soy sauce next time.
Bland: If bland: Increase garlic and ginger by 50%, add more soy sauce, incorporate 1/2 teaspoon red pepper flakes, or finish with a squeeze of lime juice and extra green onions.

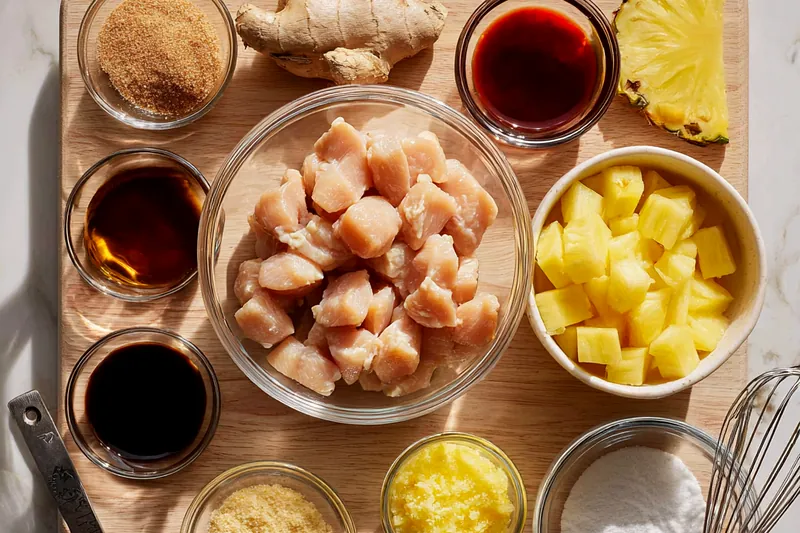
Selecting the Best Ingredients for Perfect Results
Quality ingredients make a noticeable difference in this recipe. For the chicken, choose plump, pale pink breasts without dark spots or excess moisture – this ensures tender, flavorful results. Organic or free-range chicken offers superior taste and texture, though it's not essential. When selecting brown sugar, both light and dark work, but light brown sugar provides a more balanced sweetness while dark creates a deeper molasses flavor. Always use packed measurements for brown sugar – loosely measured sugar will result in a less sweet, thinner sauce that won't caramelize properly.
Fresh garlic and ginger are non-negotiable for authentic flavor – jarred versions lack the aromatic punch that makes this dish special. Choose firm garlic cloves without green sprouts and fresh ginger root with smooth, tight skin. For pineapple, canned chunks in juice (not syrup) work perfectly and are often more convenient than fresh, plus you get the pineapple juice for the sauce. If using fresh, select a pineapple that's golden yellow with a sweet aroma at the base. Low-sodium soy sauce is recommended to control saltiness – you can always add more, but you can't take it away. Rice vinegar is milder than regular vinegar and essential for the proper flavor balance.
Essential Ingredient Notes
- Brown Sugar: Use packed brown sugar measurements for accurate sweetness. Light brown creates balanced flavor; dark brown adds deeper molasses notes. Store in an airtight container with a terra cotta sugar keeper or piece of bread to prevent hardening. If hardened, microwave with a damp paper towel for 20 seconds.
- Pineapple: Canned pineapple chunks in juice (not syrup) work best for consistent sweetness and you get the juice for sauce. Drain well before using. Fresh pineapple is excellent but more work – choose one that's golden and aromatic. Always save 1/2 cup of the liquid whether from can or fresh-squeezed.
- Chicken: Boneless, skinless chicken breasts should be pale pink and firm. Cut into uniform 1-inch cubes for even cooking. Pat completely dry before cooking to ensure proper browning. For best results, chicken should be at room temperature (20 minutes out of fridge) before cooking for more even doneness.
Mastering the Technique for Restaurant-Quality Glaze
The secret to achieving that coveted glossy, clingy glaze is all about timing and temperature control. Start by cooking your chicken over medium-high heat to develop a golden crust – this Maillard reaction creates depth of flavor and gives the glaze something to grip onto. Don't move the chicken too much; let it sit for 2-3 minutes per side to develop proper browning. Once you add your sauce ingredients, resist the urge to crank up the heat. Medium heat allows the sugar to melt and caramelize without burning, while giving the flavors time to meld into a cohesive sauce.
The cornstarch slurry technique is crucial for the perfect glaze consistency. Always mix cornstarch with cold water in a separate bowl before adding – this prevents clumping that ruins texture. Add the slurry in a steady stream while stirring constantly, and watch the transformation as the sauce thickens from thin liquid to luxurious glaze within 2-3 minutes. The ideal consistency is when the sauce coats the back of a spoon and slowly drips off rather than running immediately. When you add the chicken and pineapple back to the pan, toss gently but thoroughly for 3-4 minutes – this allows the glaze to fully coat each piece and gives the pineapple edges time to caramelize slightly, adding another layer of flavor and texture.
The Perfect Glaze Consistency
Achieving the ideal glaze consistency is the difference between mediocre and magnificent. Your sauce should be thick enough to coat the chicken without pooling at the bottom, yet fluid enough to distribute evenly. The test: dip a spoon in the glaze and run your finger across the back – if the line holds without the sauce running back together immediately, you've nailed it. This usually takes 2-3 minutes of simmering after adding the cornstarch slurry. If too thick, add liquid one tablespoon at a time; if too thin, simmer longer or add more slurry. Remember: the sauce will thicken slightly as it cools, so aim for just slightly thinner than your target consistency.
Brown Sugar Pineapple Chicken
📋 Ingredients
For the Chicken
- 1/2 cup brown sugar, packedLight brown for balanced flavor; dark brown for deeper molasses notes
- 1/4 cup soy sauceUse low-sodium to control saltiness
- 2 tablespoons ketchupAdds body and subtle tang to the sauce
- 1 tablespoon rice vinegarEssential for balancing sweetness; don't substitute with regular vinegar
- 1/2 cup pineapple juiceReserved from canned pineapple or fresh-squeezed
- 3 cloves garlic, mincedFresh only – about 1 tablespoon minced
- 1 teaspoon fresh ginger, gratedUse a microplane for best texture
- 2 tablespoons cornstarchFor thickening the glaze to perfect consistency
- 2 tablespoons waterCold water for mixing with cornstarch
- 1/4 teaspoon red pepper flakesOptional – adds a subtle heat that balances sweetness
For the Sauce
- 1.5 lbs boneless skinless chicken breastsCut into 1-inch cubes; chicken thighs work too
- 1 can (20 oz) pineapple chunksIn juice, not syrup – drain and reserve 1/2 cup juice
- 2 tablespoons vegetable oilFor browning chicken; canola or avocado oil works
- Salt and pepperFor seasoning chicken before cooking
- 2 green onions, slicedFor garnish – use both white and green parts
- 1 tablespoon sesame seedsOptional garnish – adds nutty flavor and visual appeal
Instructions
Prepare the Chicken
Pat chicken cubes dry with paper towels and season lightly with salt and pepper. Heat vegetable oil in a large skillet or wok over medium-high heat. Add chicken in a single layer (work in batches if needed) and cook for 5-7 minutes, turning occasionally, until golden brown on all sides and cooked through (internal temperature 165°F). Remove chicken from skillet and set aside on a plate.
Make the Brown Sugar Sauce
In the same skillet, reduce heat to medium. Add minced garlic and grated ginger, sautéing for 30 seconds until fragrant but not browned. Add brown sugar, soy sauce, ketchup, rice vinegar, and pineapple juice. Stir well and bring to a gentle simmer, stirring occasionally to help the brown sugar dissolve completely, about 2-3 minutes.
Thicken the Glaze
In a small bowl, whisk together cornstarch and cold water until smooth with no lumps. Pour the slurry into the simmering sauce while stirring constantly in one direction. Continue cooking for 2-3 minutes, stirring frequently, until the sauce thickens to a glossy glaze that coats the back of a spoon. The sauce should be syrupy but still fluid.
Combine and Caramelize
Return the cooked chicken to the skillet along with the drained pineapple chunks. Toss everything together gently but thoroughly to coat evenly with the glaze. Cook for 3-4 minutes, stirring occasionally with a gentle folding motion, until the pineapple edges begin to caramelize and turn golden. The chicken should be completely coated in the sticky, glossy glaze.
Garnish and Serve
Remove from heat immediately to preserve the glossy texture of the glaze. Transfer to a serving dish or serve directly from the skillet. Garnish generously with sliced green onions and a sprinkle of sesame seeds. Serve immediately over steamed white rice, fried rice, or alongside your favorite vegetables while the glaze is at its most beautiful and the dish is piping hot.
Recipe Notes & Tips
Storage
Store leftovers in an airtight container in the refrigerator for up to 3 days. The glaze will thicken when cold. Reheat gently in a skillet over medium heat, adding 1-2 tablespoons of water or pineapple juice to restore the glaze consistency. Can be frozen for up to 2 months; thaw overnight in refrigerator before reheating.
Serving Suggestions
Serve over steamed jasmine or basmati rice for a classic presentation. For a complete meal, pair with steamed broccoli, snap peas, or stir-fried vegetables. Also excellent over cauliflower rice for a low-carb option, or alongside fried rice for a more indulgent meal. Garnish with extra green onions, sesame seeds, or crushed peanuts for added texture and flavor.
Variations
Make it spicier: Add 1/2-1 teaspoon red pepper flakes or sriracha to the sauce. Use chicken thighs instead of breasts for juicier, more flavorful meat. Add vegetables: Toss in bell peppers, snap peas, or broccoli florets during the last 5 minutes of cooking. For a tangier version, increase rice vinegar to 2 tablespoons and add a squeeze of lime juice before serving. Substitute honey for half the brown sugar for a different flavor profile.